Editing the Score
Quick Start Guide2025/10/2 9:232026/7/5 15:33Installing VoiSona2025/11/3 8:252026/1/5 10:39Launching VoiSona2025/11/2 12:152026/7/1 13:55Signing In2025/11/2 12:152026/7/1 14:05Selecting a Voice Library2025/11/2 12:152026/7/1 14:10Editing the Score2025/11/2 12:152026/7/1 14:54Adjusting Parameters2025/11/2 12:152026/7/1 16:59Importing and Exporting Files2025/11/2 12:152026/6/1 17:00Changing Preferences2025/11/2 12:152026/6/2 13:41Frequently Asked Questions2025/11/2 12:152026/5/4 15:06
In VoiSona, basic score editing can be done easily.
Furthermore, by setting dynamics, articulations, and vocal expressions, more expressive performances can be achieved.
Editing NotesInputting NotesChanging Note Quantize SettingsSelecting a NoteSelecting Multiple NotesChanging Note LengthMoving NotesDeleting NotesSplitting NotesMerging NotesSwitching Tools with the Ctrl KeyEditing LyricsEntering LyricsDropping Vowels (Japanese)Assigning English Lyrics Across Multiple Notes (Japanese, English)Turning Off Liaison (English)Setting the Four Tones (Mandarin)Entering Lyrics in BulkEditing Lyric Phoneme SequencesJapanese PhonemesEnglish Phonemes (for English Song Voice Library)Setting the Language for Entering NotesConfiguring Lyric Input OptionsSetting Tempo, Time Signature, Key Signature, and DynamicsChanging PropertiesDisplaying PropertiesSetting Articulations and SlursSetting Vocal ExpressionsSetting the LanguageInserting MeasuresChanging Standard PitchReducing Playback Load (Freezing Tracks)
Editing Notes
This section explains the various operations for editing musical notes.
Inputting Notes
You can enter musical notes by following the steps below.
- Select either the "Draw Tool" or the "Line Tool".
- On the piano roll, click or drag left or right.
When there are multiple song tracks, the positions of notes from other tracks are displayed on the piano roll.

Changing Note Quantize Settings
You can change the quantization (grid settings for aligning note input positions) from the pull-down list.
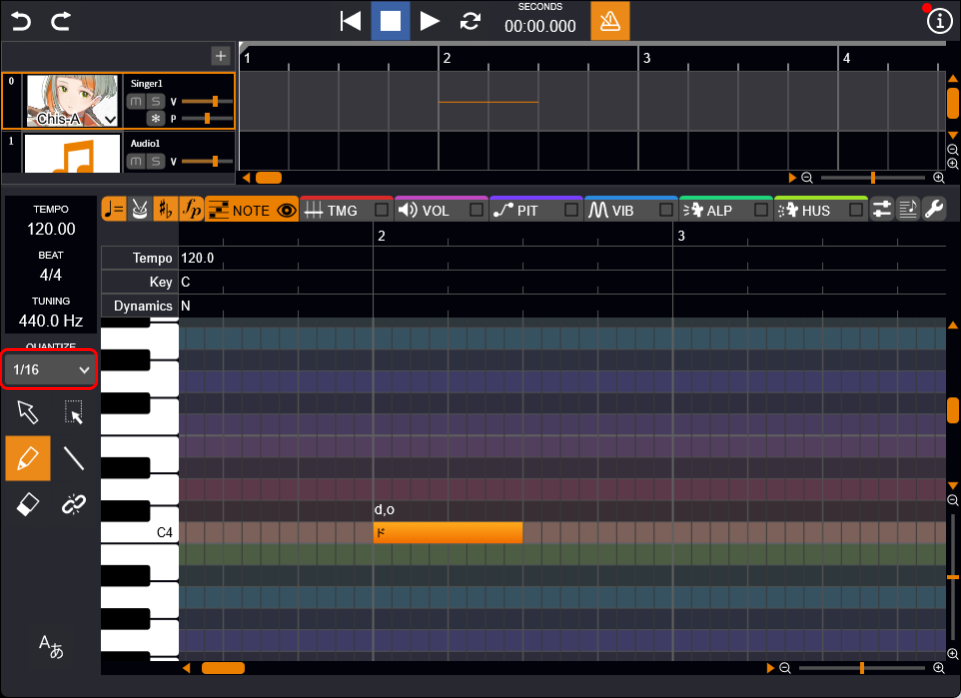
When you right-click with a note selected and choose "Quantize," the input note will be adjusted according to the current quantize settings.
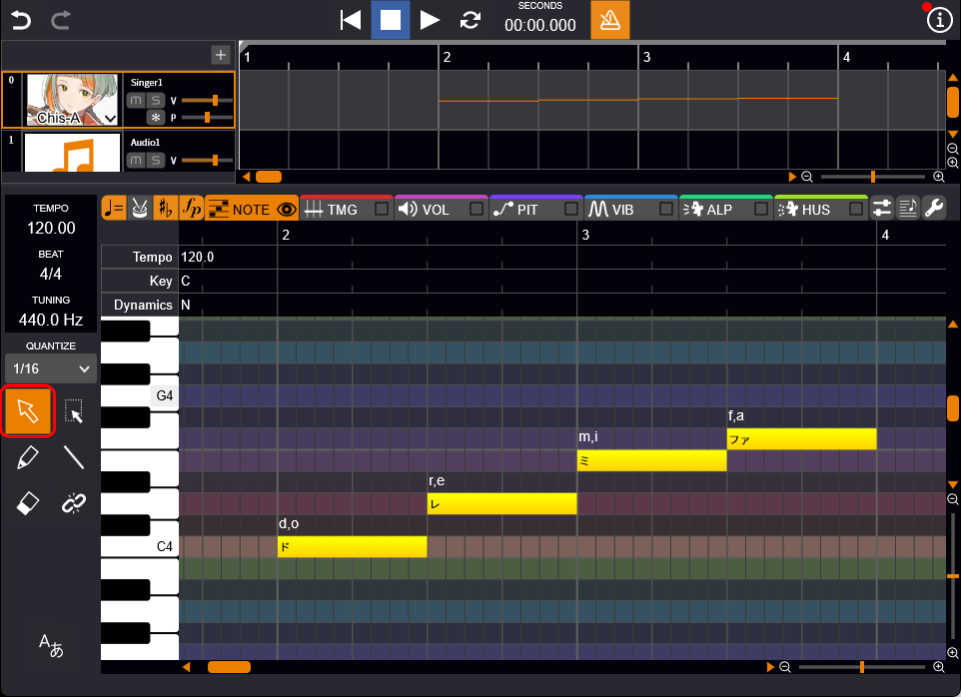
Selecting a Note
You can select notes by following the steps below.
- Select the "Selection Tool".
- Click the note.
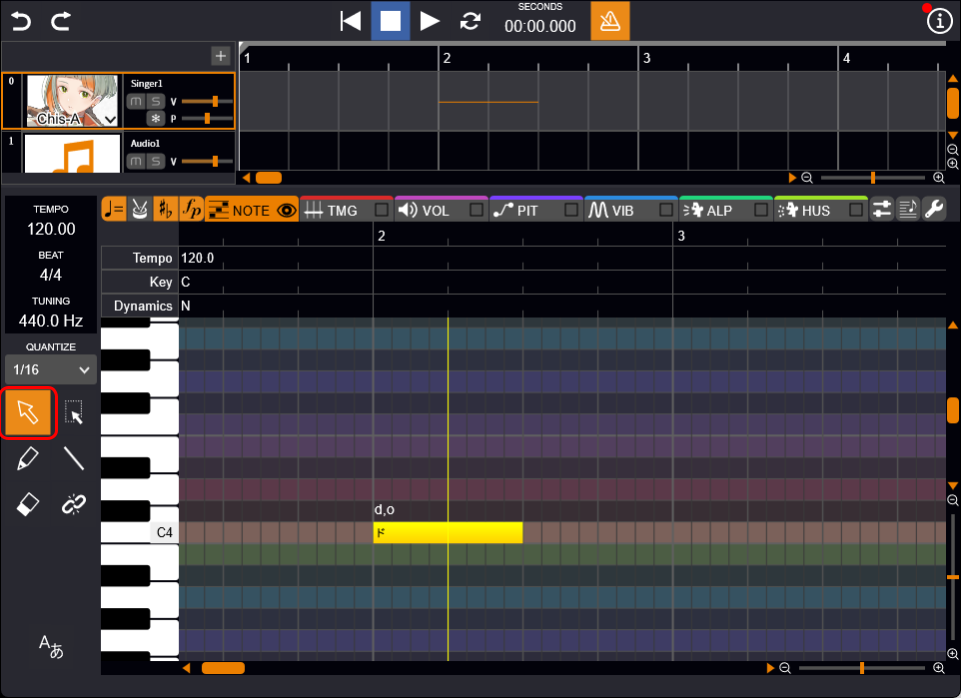
Press the Esc key to deselect the note.
If multiple notes are entered, you can select the first note with the Home key and the last note with the End key.
Selecting Multiple Notes
You can select multiple notes using the following methods.
You can perform operations such as moving, copying, and deleting the selected notes all at once.
- Drag to enclose multiple notes Select multiple notes at once.
- Ctrl+click Select multiple notes individually.
- Shift+click Select multiple consecutive notes at once.
- Shift+Left/Right Arrow keys Select consecutive notes individually.
- Click a note → Shift+Home Select all notes before the clicked note.
- Click a note → Shift+End Select all notes after the clicked note.
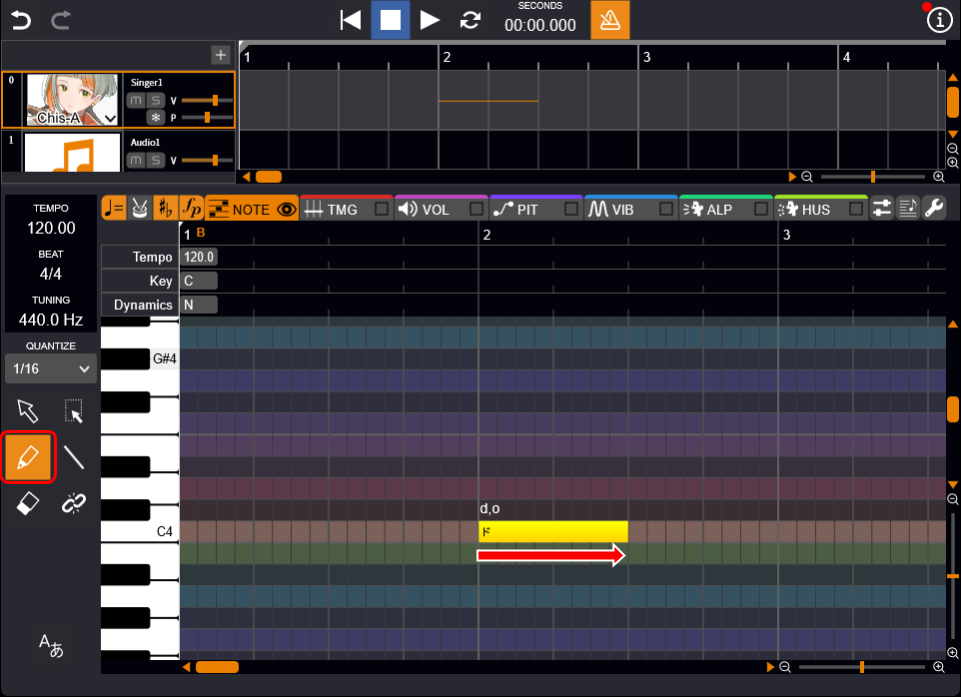
Changing Note Length
After entering a note, you can change its length.
- Select either the "Selection Tool", "Draw Tool", or "Line Tool".
- Hover the cursor over the edge of the note, and when the cursor changes to an arrow, drag left or right.
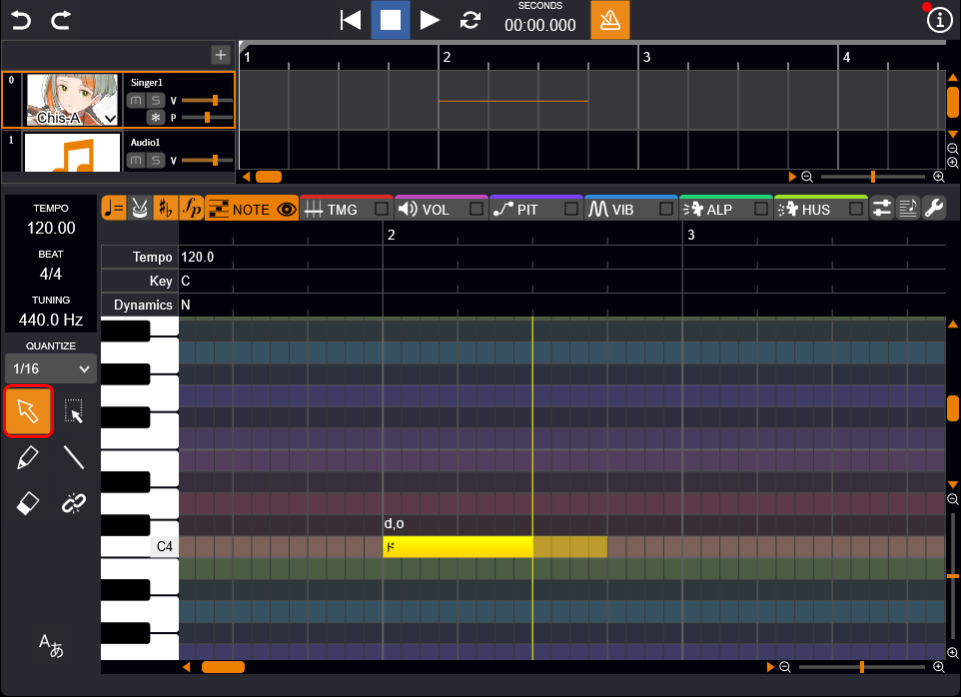
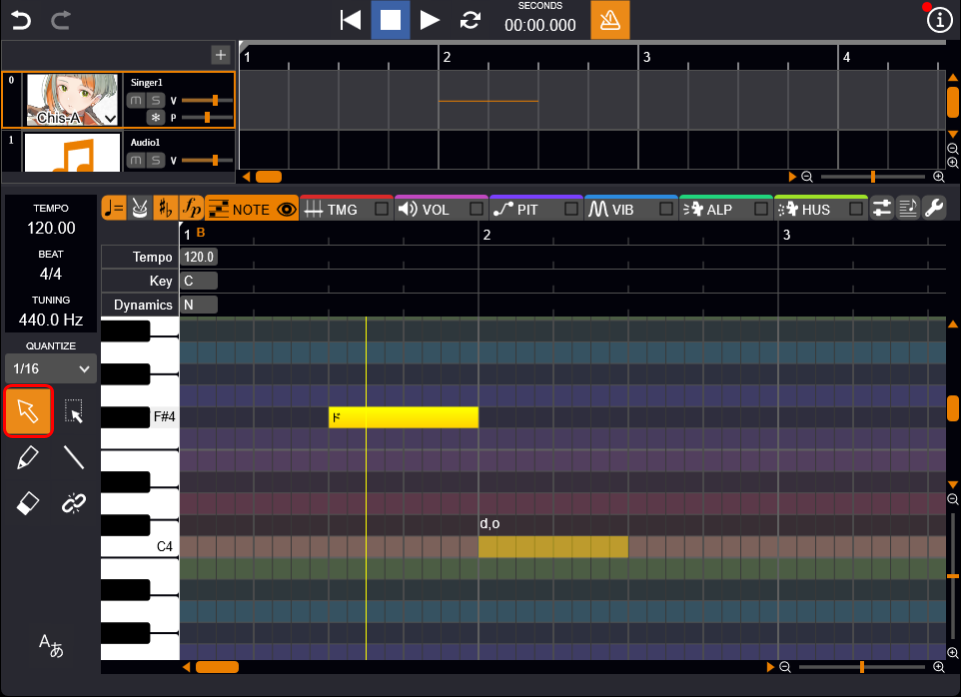
Moving Notes
You can move the notes to adjust the pitch and timing of the sounds.
- Select either the "Selection Tool", "Draw Tool", or "Line Tool".
- Hover the cursor over the note, and when the cursor changes to a hand, drag to the desired position.
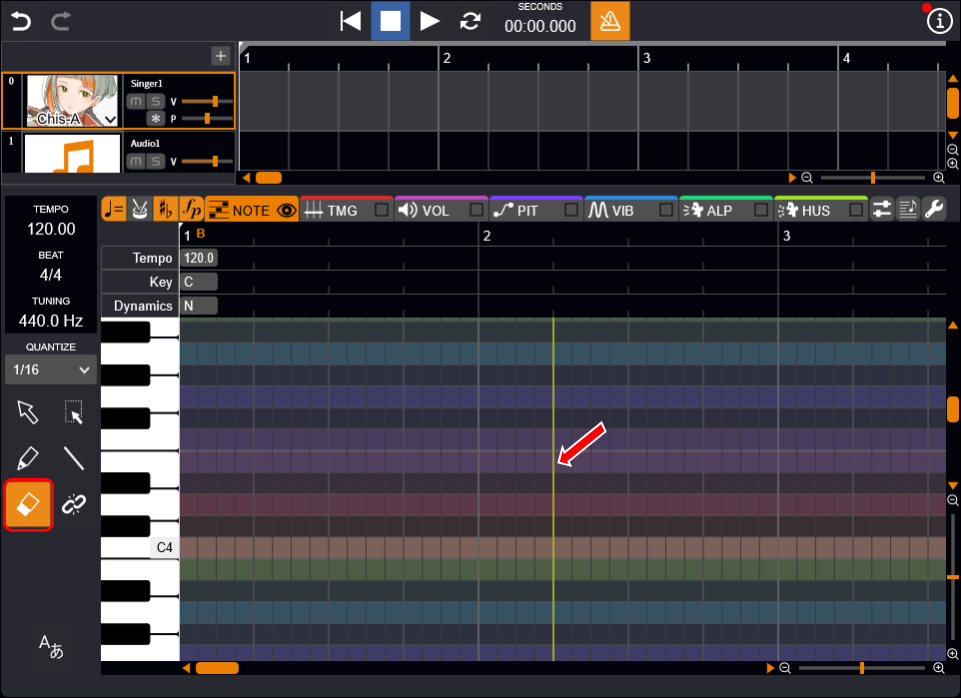
Deleting Notes
You can delete notes by following the steps below.
- Select the "Eraser Tool".
- Click the note.
Splitting Notes
You can split a single note into multiple notes.
- Select the "Split and Join Tool".
- Hover the cursor over the note, and when the cursor changes to scissors, click at the position where you want to split.
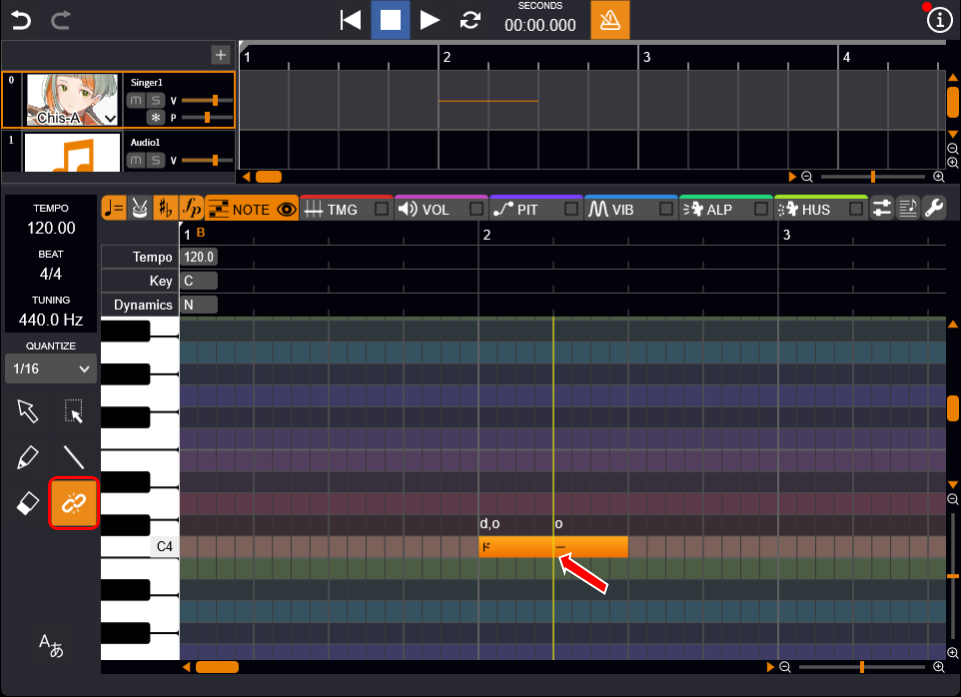
Merging Notes
You can combine the preceding and following notes into a single note.
- Select the "Split and Join Tool".
- Hover the cursor over the edge of the note, and when the cursor changes to a bind icon, click.

Switching Tools with the Ctrl Key
You can temporarily switch between tools using the Ctrl key, saving you the trouble of selecting tools.
- Select one of the tools.
- Press the Ctrl key. While holding down the Ctrl key, the current tool will switch as follows.
- "Draw Tool" / "Line Tool" → "Eraser Tool"
- "Eraser Tool" → "Selection Tool"
- "Selection Tool" / "Bulk Selection Tool" / "Split and Join Tool" → "Draw Tool"
Editing Lyrics
This explains the various operations for editing lyrics.
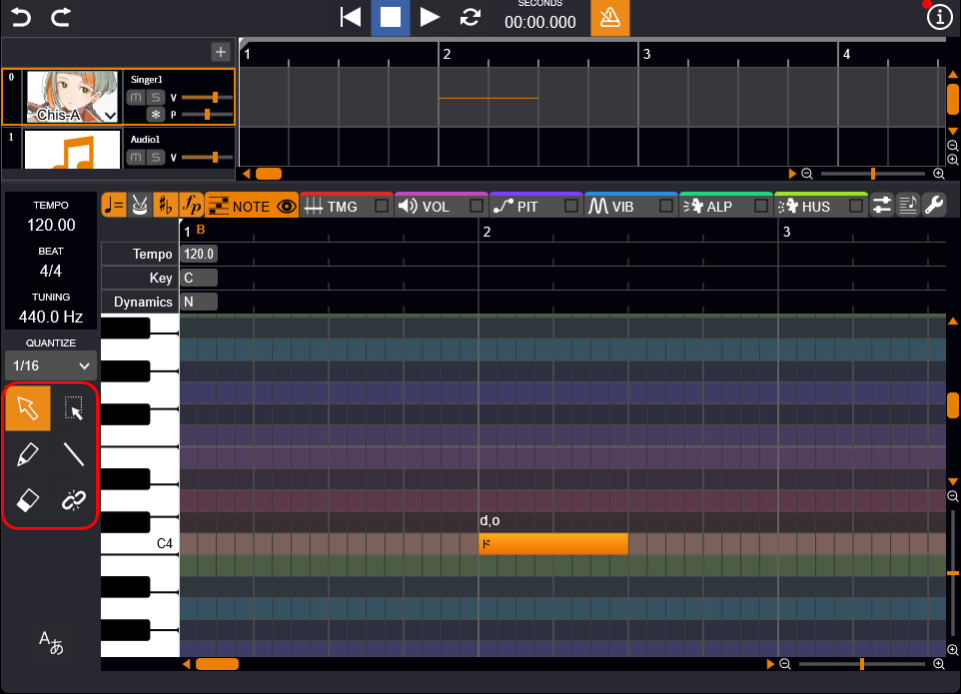
Entering Lyrics
You can enter lyrics directly on the musical notes.
- Select either the "Selection Tool", "Bulk Selection Tool", "Draw Tool", or "Line Tool".
- Double-click a note.
- Enter the lyrics and confirm.
While entering lyrics, you can move to the next note with the Tab key and to the previous note with Shift+Tab.
If you enter a space in the middle of the lyrics, the lyrics after the space will be assigned to the next note.
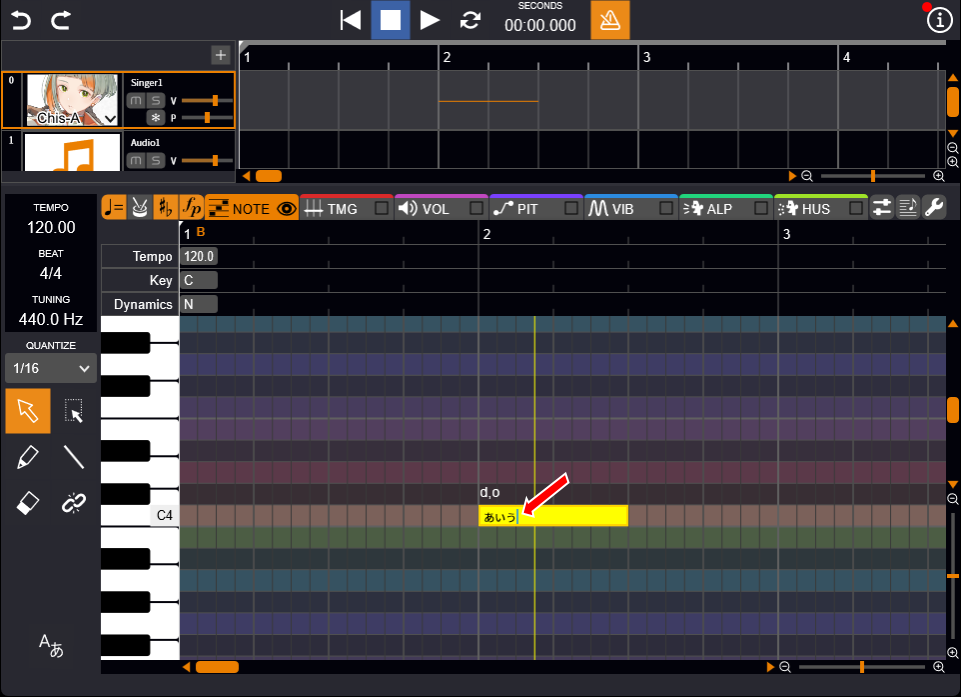
Dropping Vowels (Japanese)
Adding a full-width apostrophe (’) at the end of the lyrics will drop the vowel.
For example, if the lyrics are "いぇす" it will be pronounced as "y, e, s, u", but if it is "いぇす’" it becomes "y, e, s", dropping the /u/ sound.
Each note must contain at least one vowel.
Example, if only "す’" is entered in a single note, the vowel will not be omitted.
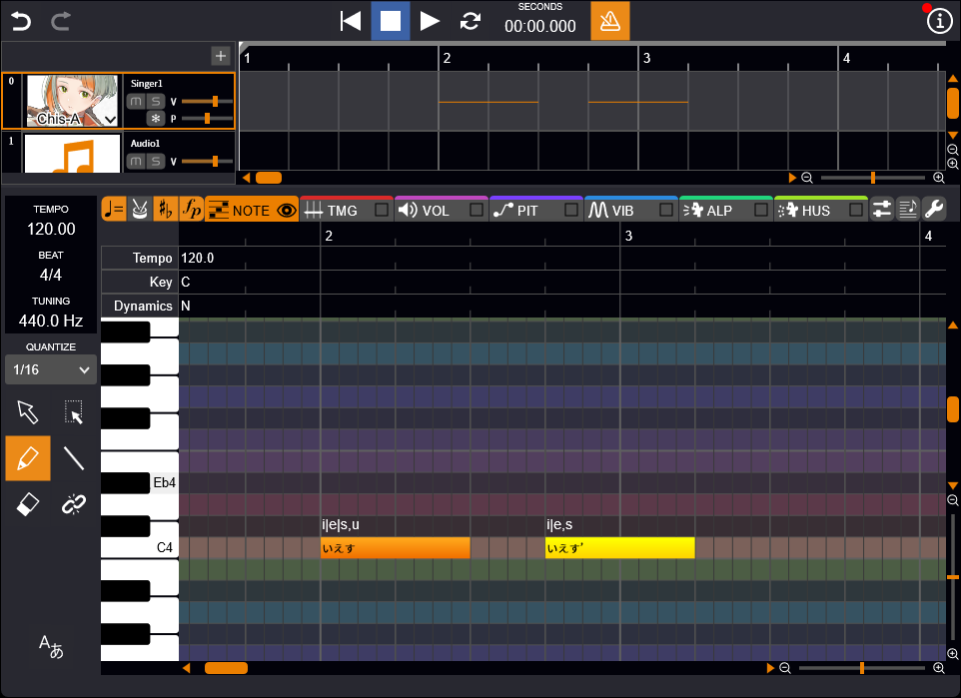
Assigning English Lyrics Across Multiple Notes (Japanese, English)
You can split a single English word across multiple notes.
Prepare the required number of notes and enter the lyrics in each, then add a hyphen (-) at the beginning of the lyrics on the following notes.
This makes the word recognized as one word spanning multiple notes, enabling natural pronunciation.
For example, entering "li" and "-ke" on two notes will be pronounced as "like".
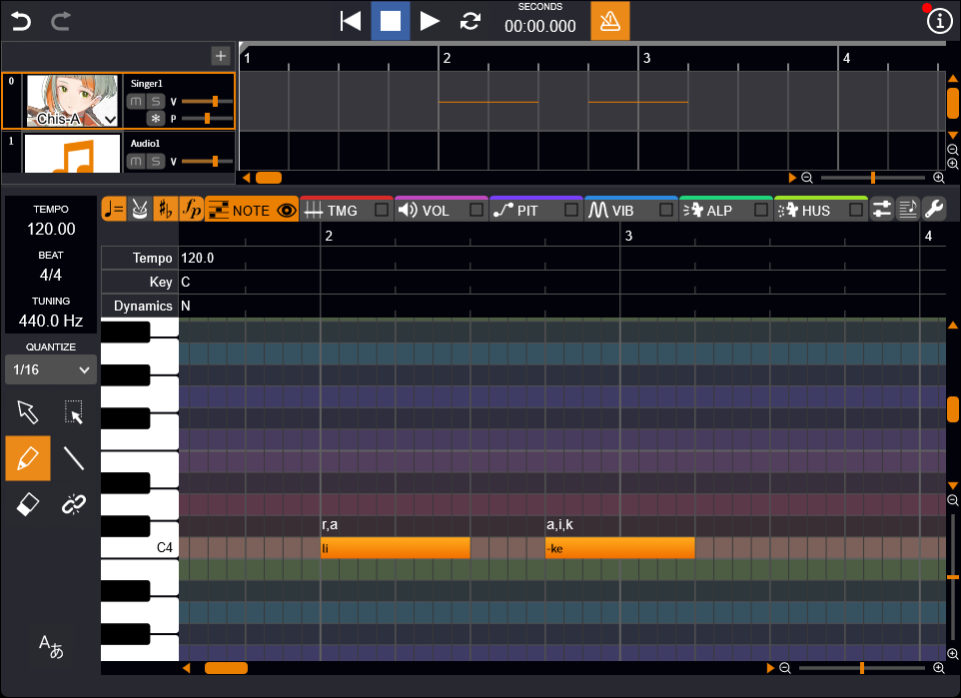
When "Auto Split English Lyrics" is enabled in the "Language Settings" button options, English lyrics are automatically segmented into syllables and assigned to notes.
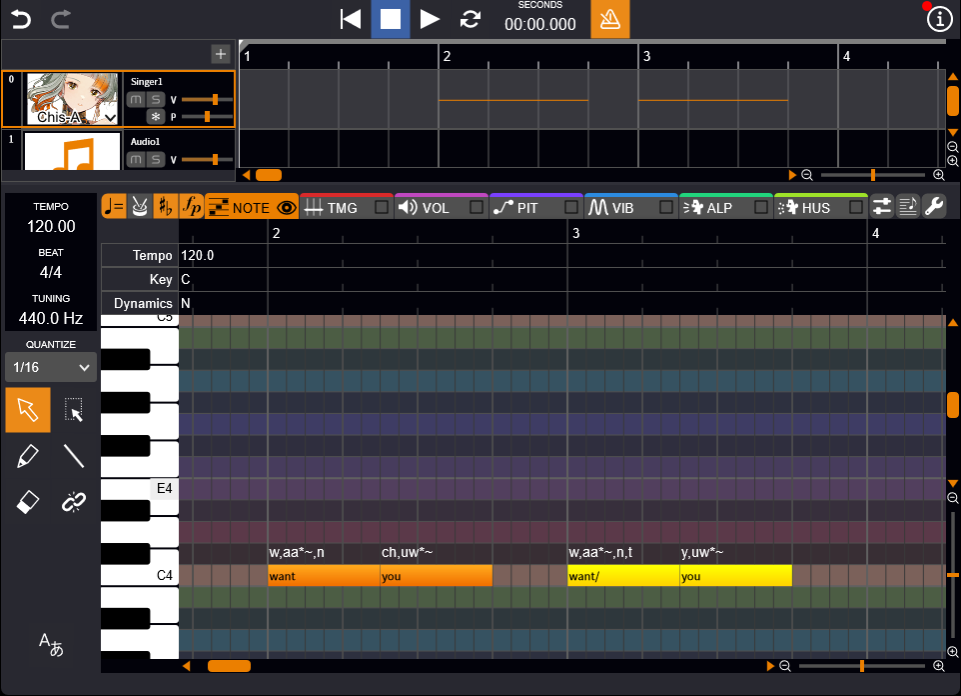
Turning Off Liaison (English)
In English lyrics, adjacent words are sometimes pronounced as if they are connected. By adding a half-width slash (/) to the end of a word in the lyrics, you can suppress the liaison between that word and the next.
For example, if you enter "want" and "you," they tend to be pronounced together as a single blended sound, like "wantcha." If you enter "want/" and "you," the words are kept separate and each is pronounced on its own, as in "want you."
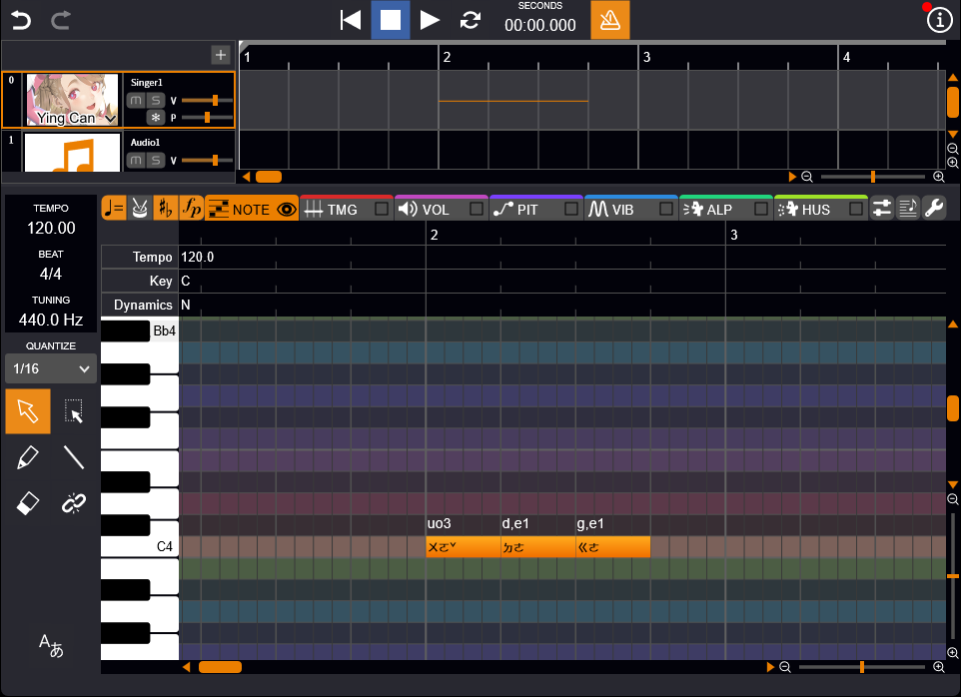
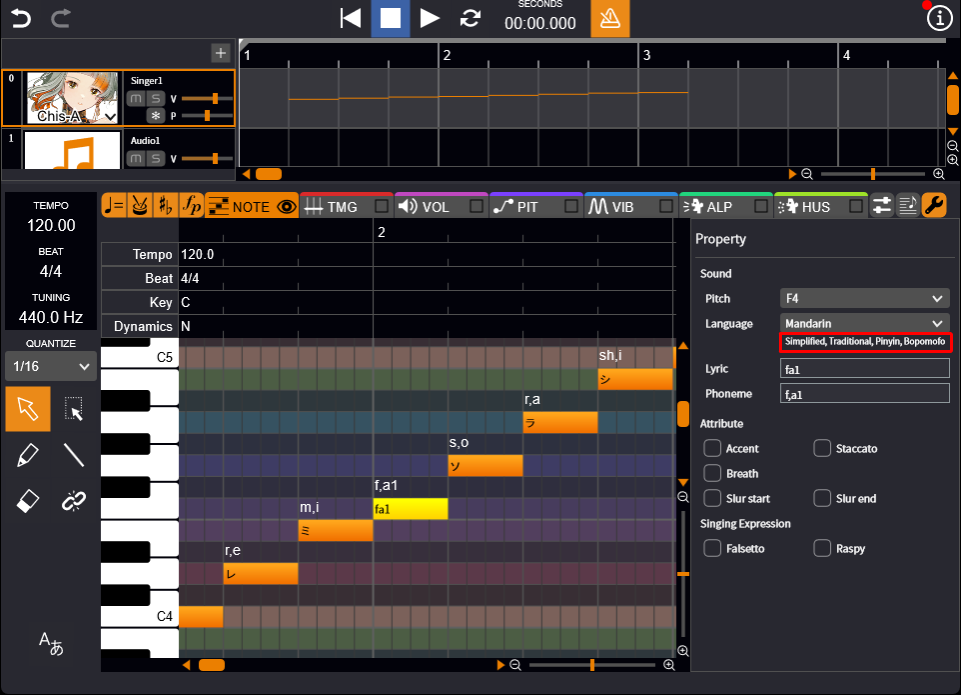
Setting the Four Tones (Mandarin)
Mandarin lyrics can be entered in simplified Chinese characters, traditional Chinese characters, Pinyin, and Bopomofo.
When entering Pinyin or Bopomofo, you need to set the four tones as follows.
- When entering lyrics in Pinyin, add the numbers "0" to "4" after the Pinyin.
- When entering lyrics in Bopomofo, add the tone marks "˙", "ˉ", "ˊ", "ˇ", and "ˋ" after the Bopomofo. (The light tone "˙" can be added before the Bopomofo.)
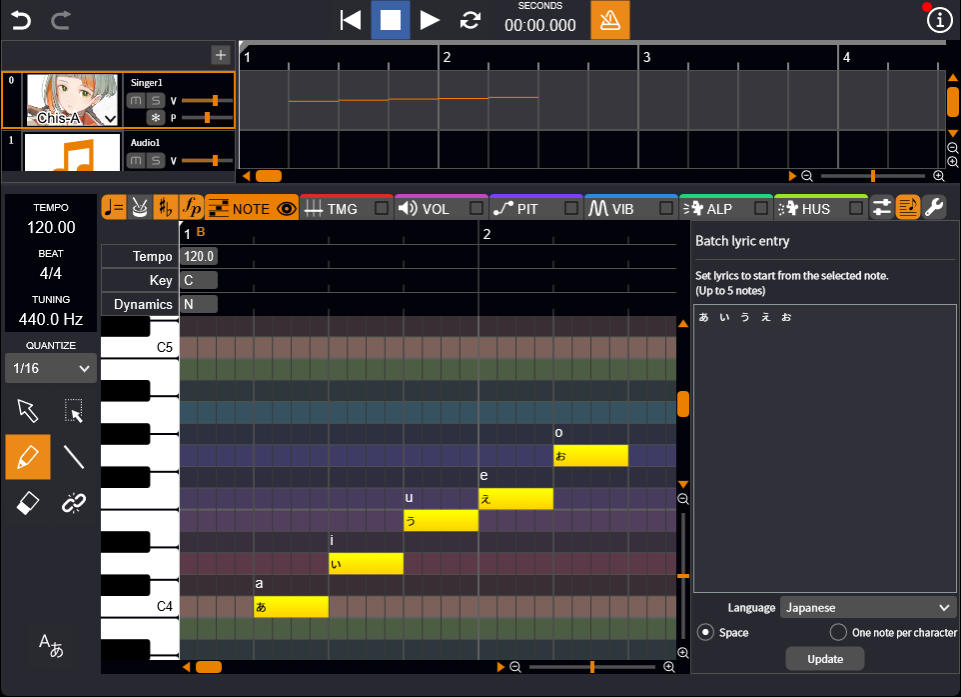
Entering Lyrics in Bulk
You can input lyrics assigned to multiple notes at once.
If a note is selected, lyrics will be input starting from that note.
If no note is selected, lyrics will be input starting from the first note.
- Click the "Batch lyric entry" button to open the panel.
- Enter the lyrics.
For voice libraries supporting multilingual singing, select the desired language from the dropdown list.
- Set the lyrics assignment method using the radio buttons.
- "Space" Assign groups separated by spaces to one note each.
- "One note per character" or "One note with one syllable" Assign one character (Japanese) or one syllable (English, Mandarin) to each note.
- Click "Update".
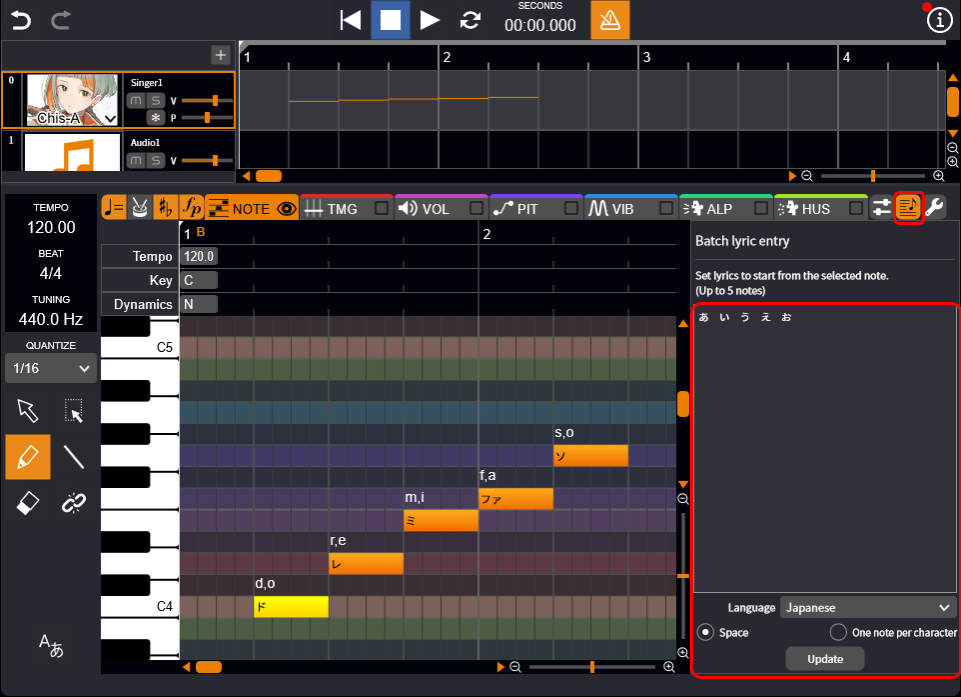
Lyrics are entered into the notes.
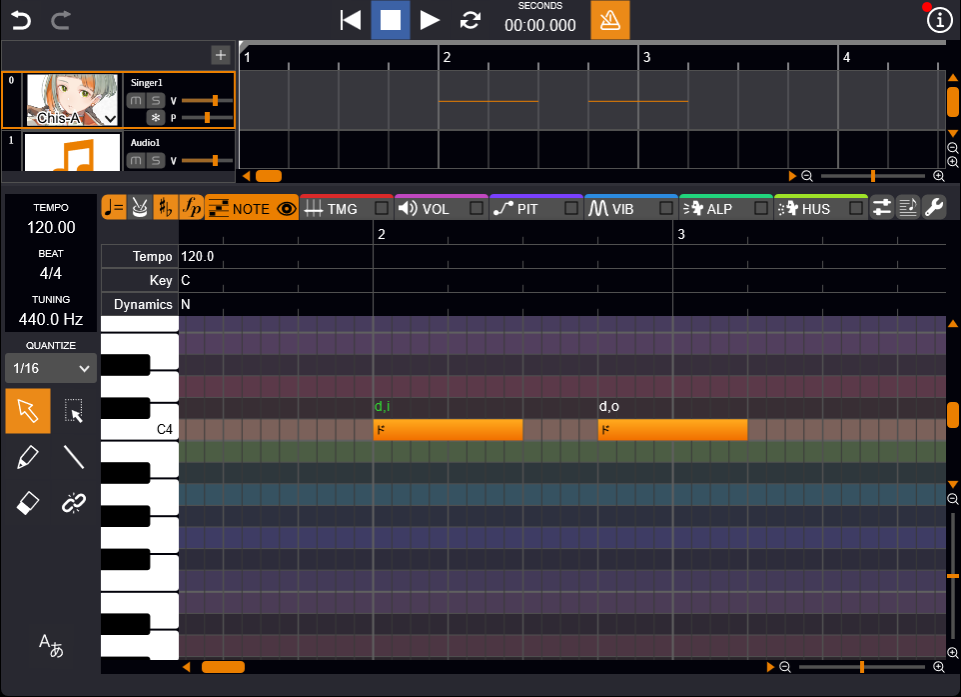
Editing Lyric Phoneme Sequences
You can fine-tune the pronunciation of the lyrics you have entered by directly editing the phoneme sequence.
- Select either the "Selection Tool" or the "Bulk Selection Tool".
- Double-click the location where the phoneme sequence is displayed.
- Click on the phoneme palette or edit the phoneme sequence using the keyboard.
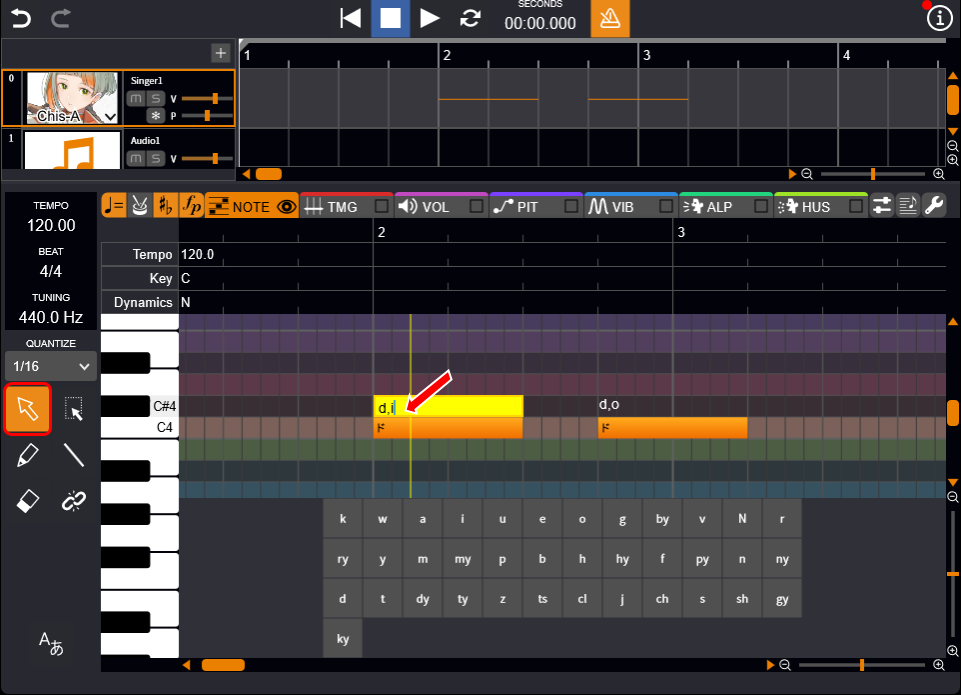
- Click on the piano roll to confirm. The phoneme sequence will be displayed in green.
About phoneme and syllable separators
- Comma (,) Separates phonemes.
- Vertical bar (|) Separates syllables.
Example: "ちせい" → "ch,i|s,e|i"
Japanese Phonemes
Japanese phonemes are as follows.
| あ, ア a | い, イ i | う, ウ u | え, エ e | お, オ o |
| か, カ k,a | き, キ k,i | く, ク k,u | け, ケ k,e | こ, コ k,o |
| さ, サ s,a | し, シ sh,i | す, ス s,u | せ, セ s,e | そ, ソ s,o |
| た, タ t,a | ち, チ ch,i | つ, ツ ts,u | て, テ t,e | と, ト t,o |
| な, ナ n,a | に, ニ n,i | ぬ, ヌ n,u | ね, ネ n,e | の, ノ n,o |
| は, ハ h,a | ひ, ヒ h,i | ふ, フ f,u | へ, ヘ h,e | ほ, ホ h,o |
| ま, マ m,a | み, ミ m,i | む, ム m,u | め, メ m,e | も, モ m,o |
| や, ヤ y,a | ゆ, ユ y,u | いぇ, イェ y,e | よ, ヨ y,o | |
| ら, ラ r,a | り, リ r,i | る, ル r,u | れ, レ r,e | ろ, ロ r,o |
| わ, ワ w,a | ゐ, ヰ i | ゑ, ヱ e | を, ヲ o |
| が, ガ g,a | ぎ, ギ g,i | ぐ, グ g,u | げ, ゲ g,e | ご, ゴ g,o |
| ざ, ザ z,a | じ, ジ j,i | ず, ズ z,u | ぜ, ゼ z,e | ぞ, ゾ z,o |
| だ, ダ d,a | ぢ, ヂ j,i | づ, ヅ z,u | で, デ d,e | ど, ド d,o |
| ば, バ b,a | び, ビ b,i | ぶ, ブ b,u | べ, ベ b,e | ぼ, ボ b,o |
| ぱ, パ p,a | ぴ, ピ p,i | ぷ, プ p,u | ぺ, ペ p,e | ぽ, ポ p,o |
| きゃ, キャ ky,a | きゅ, キュ ky,u | きぇ, キェ ky,e | きょ, キョ ky,o | |
| しゃ, シャ sh,a | しぃ, シィ s,i | しゅ, シュ sh,u | しぇ, シェ sh,e | しょ, ショ sh,o |
| ちゃ, チャ ch,a | ちゅ, チュ ch,u | ちぇ, チェ ch,e | ちょ, チョ ch,o | |
| てゃ, テャ ty,a | てぃ, ティ t,i | てゅ, テュ ty,u | てょ, テョ ty,o | |
| にゃ, ニャ ny,a | にゅ, ニュ ny,u | にぇ, ニェ ny,e | にょ, ニョ ny,o | |
| ひゃ, ヒャ hy,a | ひゅ, ヒュ hy,u | ひぇ, ヒェ hy,e | ひょ, ヒョ hy,o | |
| みゃ, ミャ my,a | みゅ, ミュ my,u | みぇ, ミェ my,e | みょ, ミョ my,o | |
| りゃ, リャ ry,a | りゅ, リュ ry,u | りぇ, リェ ry,e | りょ, リョ ry,o | |
| ヴゃ, ヴャ by,a | ヴゅ, ヴュ by,u | ヴょ, ヴョ by,o | ||
| ぎゃ, ギャ gy,a | ぎゅ, ギュ gy,u | ぎぇ, ギェ gy,e | ぎょ, ギョ gy,o | |
| じゃ, ジャ j,a | じゅ, ジュ j,u | じぇ, ジェ j,e | じょ, ジョ j,o | |
| びゃ, ビャ by,a | びゅ, ビュ by,u | びぇ, ビェ by,e | びょ, ビョ by,o | |
| ぴゃ, ピャ py,a | ぴゅ, ピュ py,u | ぴぇ, ピェ py,e | ぴょ, ピョ py,o | |
| でゃ, デャ dy,a | でゅ, デュ dy,u | でぇ, デェ dy,e | でょ, デョ dy,o |
| くぁ, クァ k,w,a | くぃ, クィ k,w,i | くぅ, クゥ k,w,u | くぇ, クェ k,w,e | くぉ, クォ k,w,o |
| ぐぁ, グァ g,w,a | ぐぃ, グィ g,w,i | ぐぅ, グゥ g,w,u | ぐぇ, グェ g,w,e | ぐぉ, グォ g,w,o |
| ぐゎ, グヮ g,w,a |
| うぃ, ウィ w,i | うぇ, ウェ w,e | うぉ, ウォ w,o | ||
| すぃ, スィ s,i | ||||
| つぁ, ツァ ts,a | つぃ, ツィ ts,i | つぇ, ツェ ts,e | つぉ, ツォ ts,o | |
| とぅ, トゥ t,u | ||||
| ふぁ, ファ f,a | ふぃ, フィ f,i | ふぇ, フェ f,e | ふぉ, フォ f,o | |
| ずぃ, ズィ z,i | ||||
| どぅ, ドゥ d,u | ||||
| ヴぁ, ヴァ v,a | ヴぃ, ヴィ v,i | ヴぅ, ヴゥ v,u | ヴぇ, ヴェ v,e | ヴぉ, ヴォ v,o |
| ん, ン N | っ, ッ cl |
English Phonemes (for English Song Voice Library)
The relationship between phonemes and IPA symbols in English is as follows.
| Phonemes | IPA Symbols |
|---|---|
| aa | ɑ |
| ae | æ |
| ax | ə, ɜ |
| axr | ər (ɚ), ɜr (ɝ) |
| ah | ʌ |
| ao | ɔ |
| aw | aʊ |
| ay | aɪ |
| b | b |
| ch | tʃ |
| d | d |
| dh | ð |
| eh | e, ɛ |
| ey | eɪ, ɛɪ |
| f | f |
| g | g |
| hh | h |
| ih | ɪ |
| iy | i |
| jh | dʒ |
| k | k |
| l | l |
| m | m |
| n | n |
| ng | ŋ |
| ow | oʊ |
| oy | ɔɪ |
| p | p |
| r | r |
| s | s |
| sh | ʃ |
| t | t |
| th | θ |
| uh | ʊ |
| uw | u |
| v | v |
| w | w |
| y | j |
| z | z |
| zh | ʒ |
| tt | Flapping t (better, little etc.) |
| dd | Flapping d (middle etc.) |
| mm | m̩ |
| nn | n̩ |
In English, the stress information for words is represented by placing the following symbols after a vowel.
However, in singing, specifying the stress often does not significantly alter the synthesized waveform.
- Primary stress (strongest emphasis): *~
- Secondary stress (slight emphasis): *
When English lyrics are entered in the Japanese song voice library, the closest Japanese phoneme will be assigned.
Please note that Japanese phonemes may not always adequately represent English pronunciation.
Setting the Language for Entering Notes
Click the "Language Settings" button to set the language of the lyrics for notes you are about to enter.
- Click the "Language Settings" button.
- Select a language from the drop-down menu.
- Notes entered afterward will use the selected language.
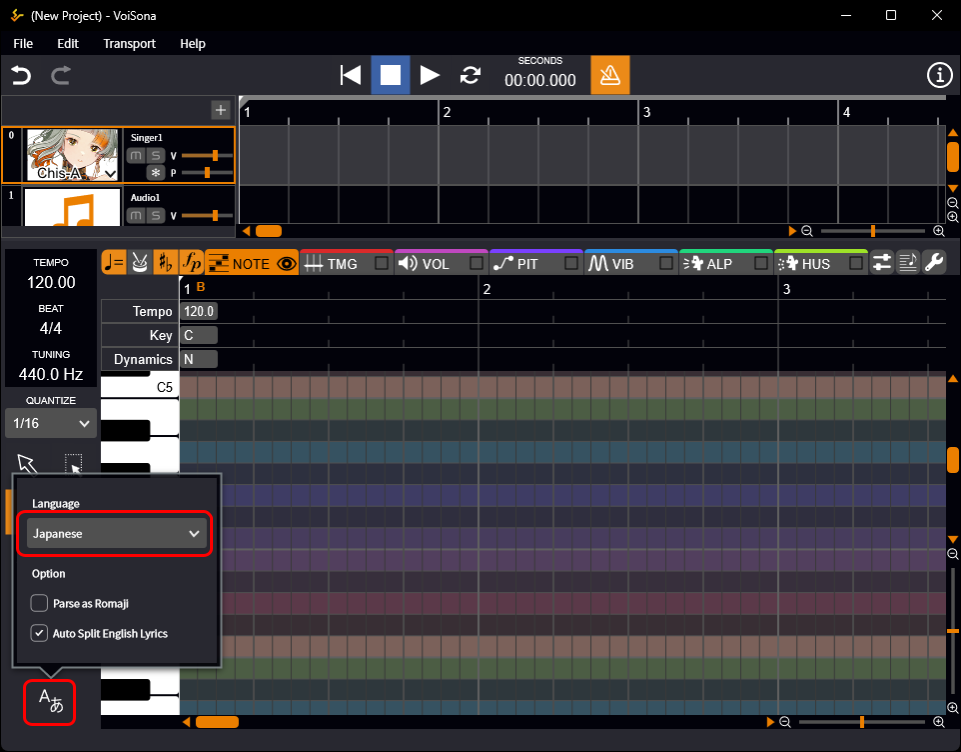
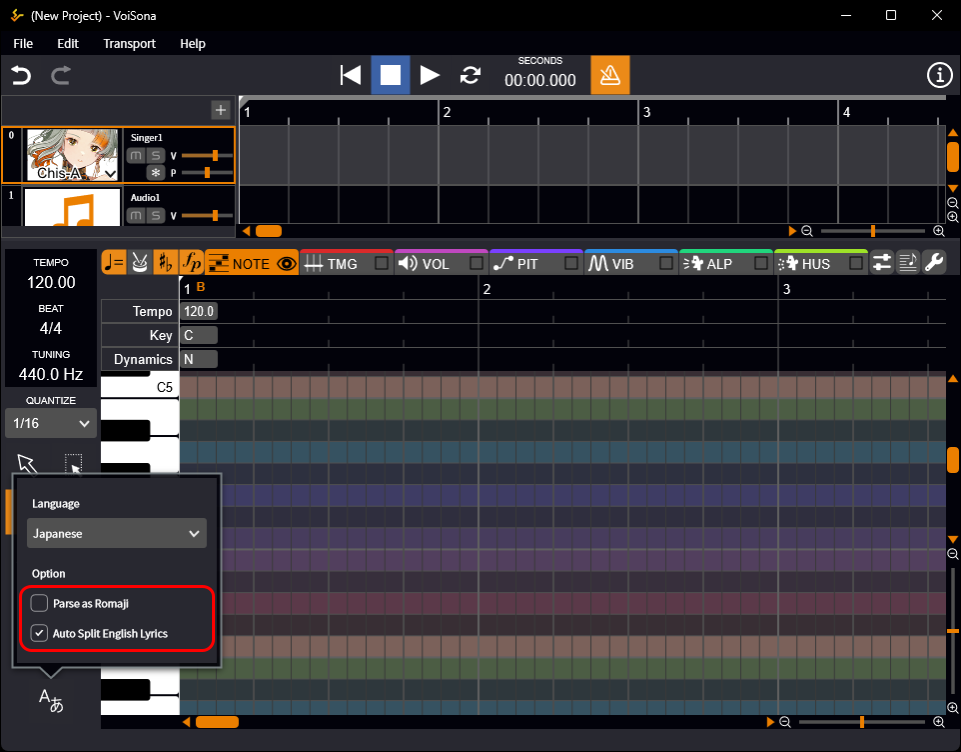
Configuring Lyric Input Options
The "Language Settings" button also allows you to configure options related to lyric input.
- Parse as Romaji (Japanese)
- When enabled, hiragana can be entered using romaji input.
- Auto Split English Lyrics (Japanese / English)
- When enabled, English lyrics are automatically split into syllables and assigned to notes.
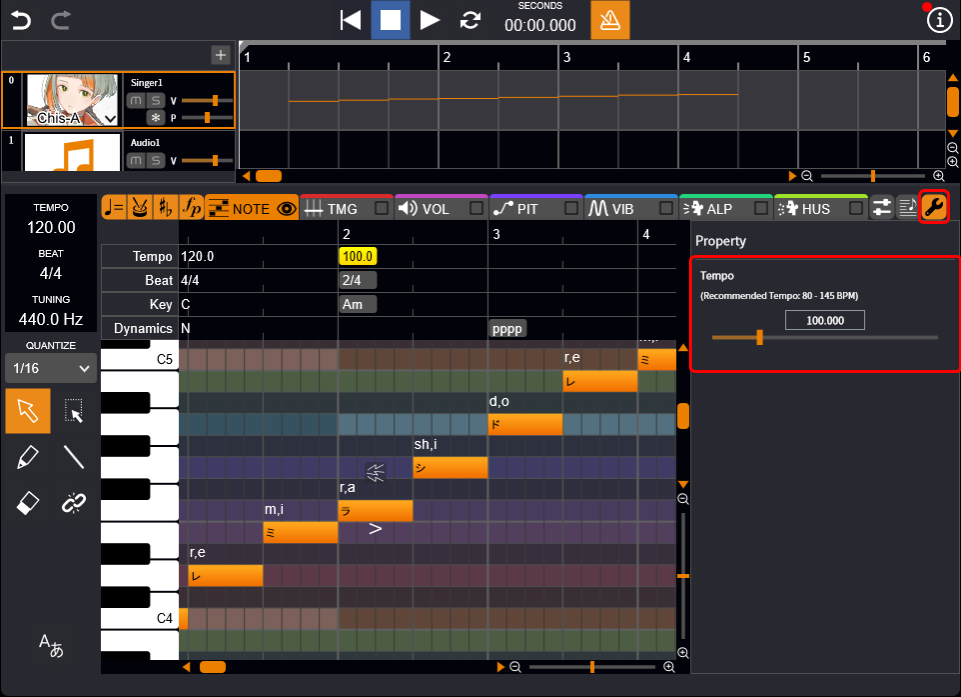
Setting Tempo, Time Signature, Key Signature, and Dynamics
Tempo, time signature, key signature, and dynamics can be set by adding symbols to each row.
- Click the "Tempo", "Time Signature", "Key Signature", or "Dynamics" button. This toggles the visibility of the row where the corresponding symbols can be added.
- Double-click the row where you want to add a symbol.
- Select the item you want to set (for tempo, enter a numeric value). The symbol will be added and reflected in the score.
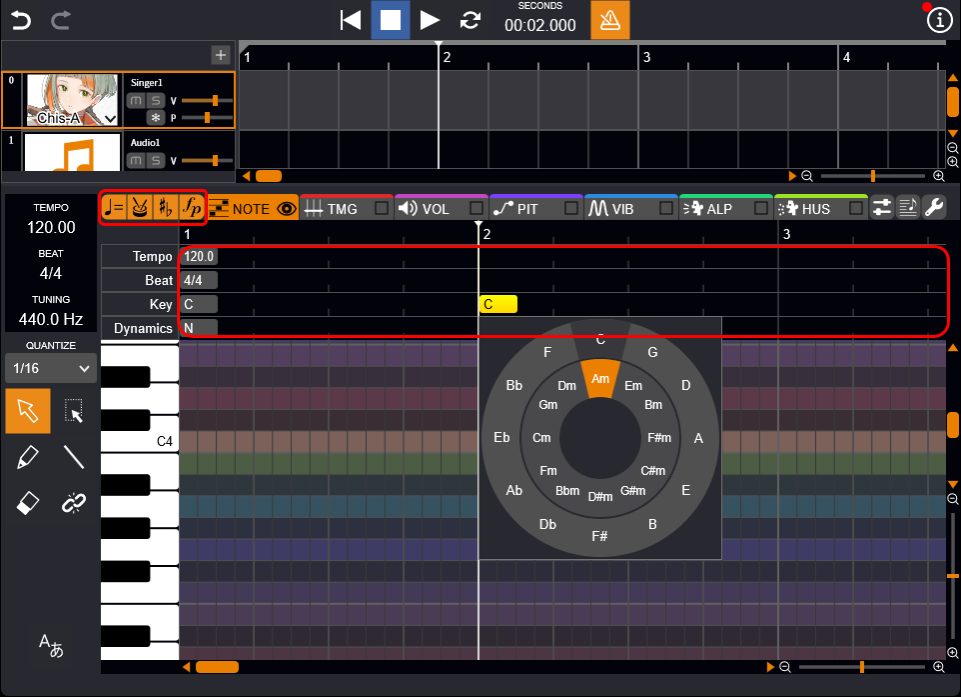

Tips for Setting
To ensure proper singing, it is important to set the key signature correctly.
Additionally, setting dynamics adds expression to the vocal performance.
However, depending on the voice library or musical score, it may be difficult to understand the effect of dynamics symbols.
Changing Properties
Various properties related to notes, tempo, time signature, key signature, and dynamics can be edited from the panel.
Displaying Properties
Follow the steps below to display each property so that you can edit it.
- Click the "Property" button to open the panel.
- Select a note, tempo, time signature, key signature, or dynamic symbol. The properties are displayed in the panel.
Setting Articulations and Slurs
You can express vocal nuance by setting articulations (accent, staccato, breath) and slurs.
- Select the note.
- Check the items you want to set in the "Attribute" section of the properties. A symbol will appear on the note.
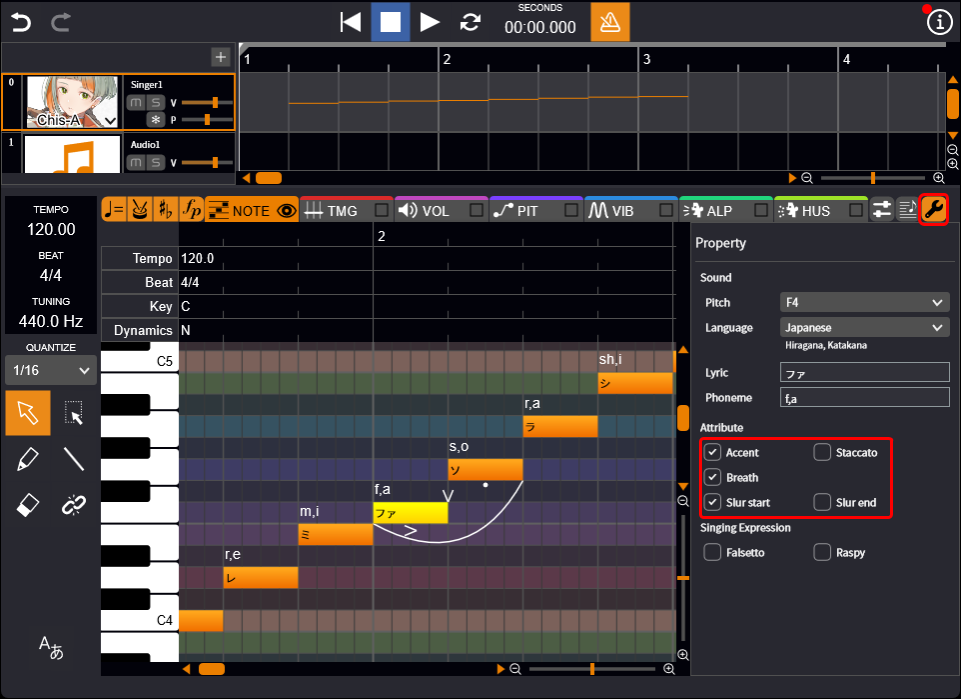
Tips for Setting
Slurs are effective when you want to connect multiple notes smoothly.
However, depending on the voice library or musical score, it may be difficult to understand the effects of articulation and slurs.
Setting Vocal Expressions
By setting vocal expressions, you can reproduce the unique singing styles of different voice providers.
- Select the note.
- Check the items you want to set in the "Singing Expression" properties. An icon will appear above the note.
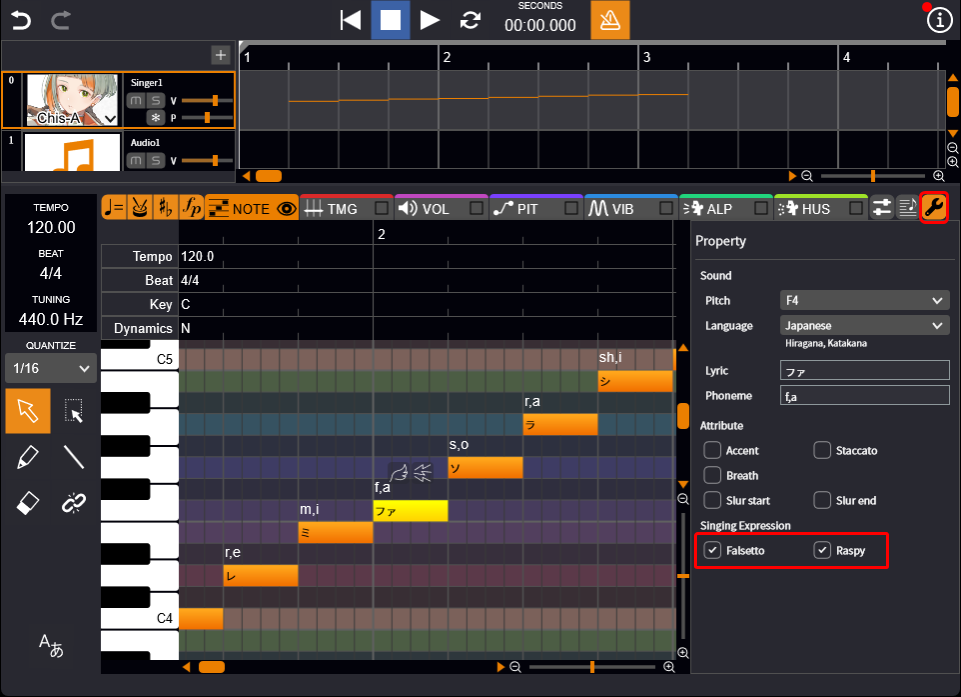
Reproduction of Singing Expression
In VoiSona, the AI has learned the distinctive singing expressions of each voice provider, allowing you to reproduce them during synthesis by specifying the "Singing Expression" option.
However, depending on factors such as voice-library versions, lyrics, and pitch, these expressions may appear to different degrees, and in some cases may not be reproduced.
Setting the Language
In voice libraries supporting multilingual singing, setting the language for each note enables input of lyrics in the corresponding language.
- Select the note.
- In the "Language" property, choose the desired language from the dropdown list. You can now input lyrics in the selected language.
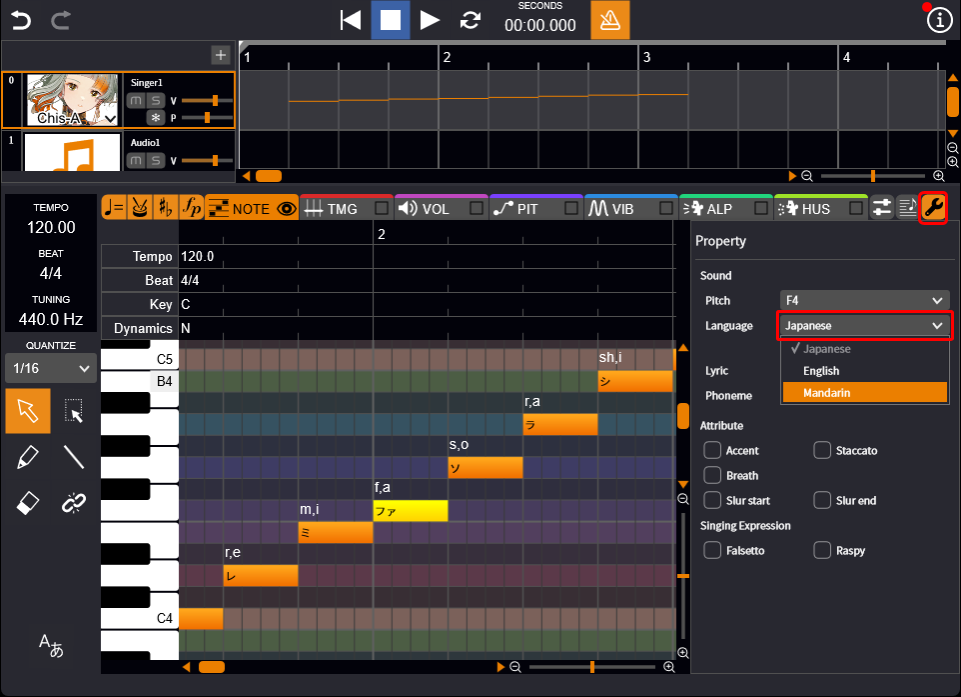
The supported lyric notation formats are displayed immediately below the language selection field.
Inserting Measures
You can insert new measures in the middle of the song.
- Click on the position where you want to insert measures using the ruler at the top of the piano roll.
- Right-click in the piano roll and select "Measure" > "Insert Measure" or "Insert Measures".
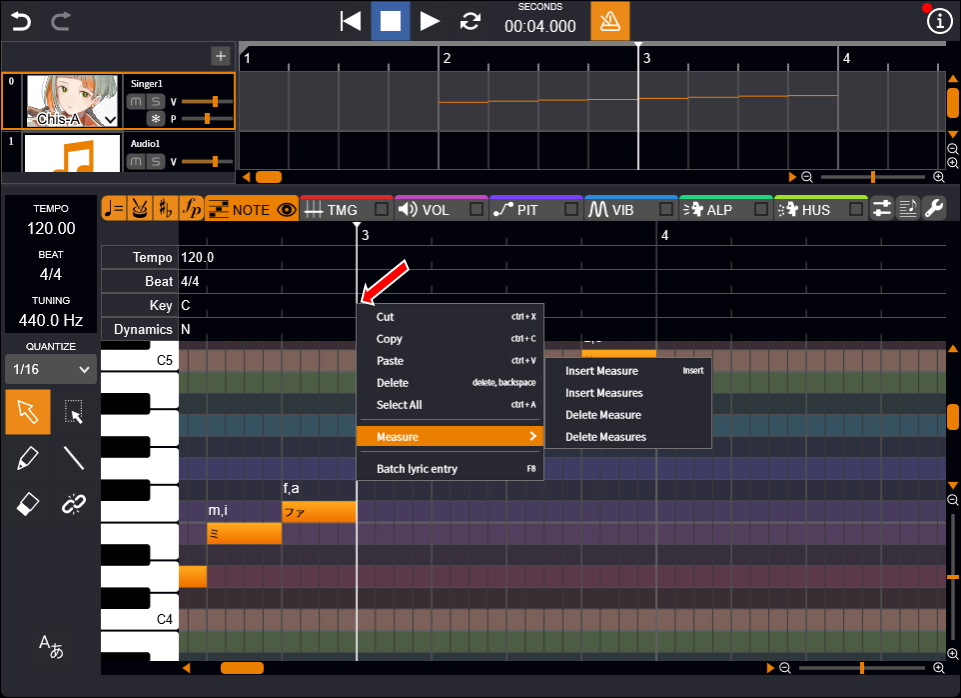
- If you choose "Insert Measures", specify the number of measures and click "Insert".
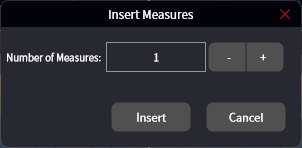
The specified number of measures will be inserted at the selected location.
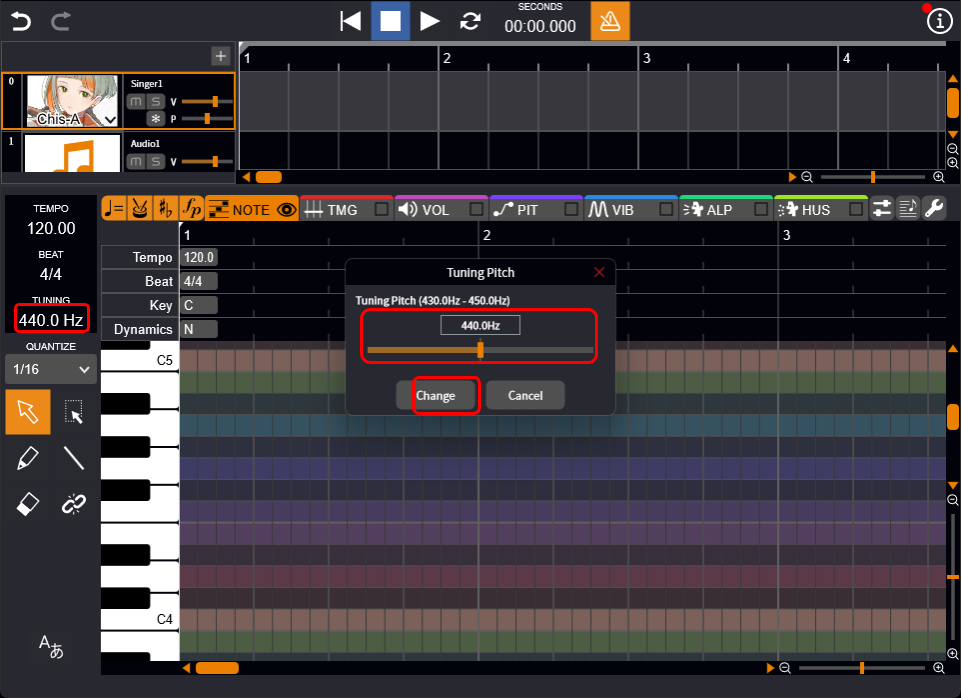
Changing Standard Pitch
Changing the standard pitch raises or lowers the pitch of all notes in the track according to the specified value.
- Double-click the area displaying "440.0 Hz".
- Enter a value directly or adjust it using the slider, then click "Change". The value will be changed.
Reducing Playback Load (Freezing Tracks)
Freezing a track reduces playback load and allows smoother performance.
- Click the "Freeze" button. The synthesis process will begin.
Depending on the performance of your device, this may take some time.
When the process is complete, the "Freeze" button will turn on and you will be able to play back the sound.

About the Freeze Track Function
Normally, voice synthesis processing is performed in real time each time playback occurs, but depending on the performance of the device, the processing load may be high, causing playback to be interrupted.
This feature allows you to synthesize the voice in advance, greatly reducing the load during playback.
In particular, if playback stutters when using multiple tracks, try freezing other tracks except the one you are editing. This may help restore smooth playback.